Labels

Monday 27 February 2012

Video of some drawings i found :)

Hey guys :)
This is a video of some of my drawings I have found around the house. Sorry that the camera is shakey, because im holding it with my hand and also i have a cold so sorry if i cough or sound weird when I'm talking :/
And also, some of these pictures are from a tutorial by Mark Crilley. Heres a link to his channel:
http://www.youtube.com/markcrilley
Also some of the pictures were inspired by SoCraftastic on YouTube, so heres her link: http://www.youtube.com/socraftastic/

Anyway, i hope you enjoyy :)

P.S. Sorry just found this out, im sooo sorry this video cut's off :( the video was too long and it automatically cut it :( im sorry :( anyway.... hope you enjoyed :)


How to make a paper crane ♥ :)

Hey guys :) Me again, This is a tutorial on how to make an origami flapping crane. :)
hope you enjoyyy!!

What you will need:
-Paper
-scissors
-creative mind
The idea for the cany wrapper cranes was from SoCraftastic on YouTube, heres her link to her channel: http://www.youtube.com/socraftastic/


Here's a typed step by step, in case you can't watch the video or something ;)

Step 1: If you already have a square piece of paper, skip this step. but if you have a rectangle, then do this step. get your piece of paper, get one of the corners, and fold up, to make a triangle. then cut the excess bit off.

Step 2: unfold, and flip the piece of paper round and fold horizontal and vertically.


Step 3. Lay the paper with the white side up. Bring in the side corners, while bringing the top corner down.

Step 4:With the open side pointing towards the left fold one corner of the square so that the edge is lined up with the center line.

Step 5: Repeat step 4

Step 6: Now turn the piece of paper over, and repeat step 4 

Step 7: Fold the top flap downwards, then unfold.

Step 8: Turn the piece of paper over and fold the same flap the other way

Step 9:Open up one side, Then lay it flat. Lift the top flap on the open end and fold it upwards, bringing in the sides.

Step 10: Then you'll get a long diamond shape. Turn the piece of paper over and repeat step 9.

Step 11: Now to make the head and the tail... Get the top layer, and fold it over. fold one of the bottom pieces up,and  get the layer you just folded, fold it back.                                                                                             

Step 12: Repeat step 11 on the other side.

Step 13: Now to form the head... choose one of the long, top pieces and fold down the corner a little bit. now you have a paper flapping crane :)

Enjoyy :) and i'm sorry i'm not good at explaining things :(

P.S. i got some of the hard instructions from a website. because i couldn't explain it. so here's a link to their website, so if you don't understand my instructions, use theirs, its easier to understand :)

Monday 20 February 2012

How to draw a simple anime girl :)

Hey guys :) today I'm going to show you how to draw a simple anime girl :) enjoy.....
The materials you will need:
-A4 piece of paper
-a pencil
-a rubber
-a creative mind ;)
Step 1: draw a circle. This is going to help you draw the cheeks and chin.


Step 2: Now draw the cheeks/chin. draw a line straight then curve it down. Repeat this on the other side.


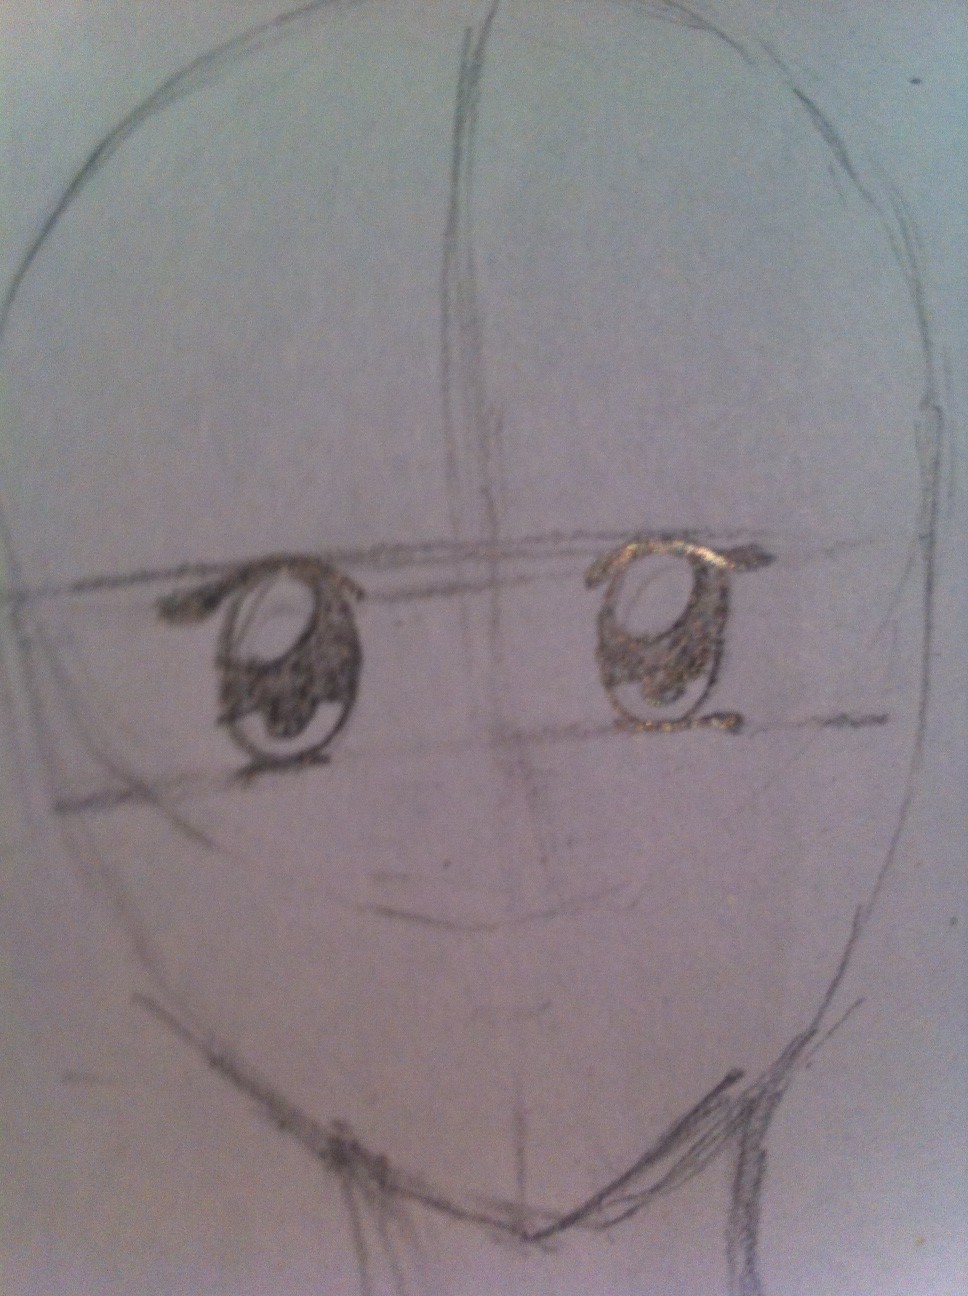
Step 3: Now add some guide lines, one straight down the middle of the face, and two lines going horizontal, and this is going to help you place the eyes.


Step 4: Now we are going to add the neck and shoulders draw two curved lines going down and draw two lines going horizontal then curve them down to form the shoulders/arm.


 Step 5: Now draw in the lines to divided the arms from the torso.


Step 6: Now we are going to draw in the eyes. To draw them, draw two ovals on either side of the middle line going down the face. There are many was on drawing anime eyes, but this is one of them. then just draw in the shiny  bits shown in the picture. If you want to, you can create your own eye look.


Step 7: Now all you have to do is colour in the non-shiny bits, like in the picture shown. also to draw eye lashes in, one of the ways is to go over the top and bottom bits of the eyes and extend it out a little bit and add little stokes to form the eye lashes.


 Step 8: Now you just add in the eyebrow, nose, mouth, and if you want, some blushes below the eyes, but you don't have to, its optional. for the eye brows, i did curved lines above the eyes, for the nose i put tow dots in below the eyes, where the middle line is, for the mouth, i did a line that sort of curved upwards. There are many different ways of drawing mouths, noses and eye brows.

Step 9: Hair time!! what i did for the hair, is she has a fringe and her hair is long. If you don't want to use this hair style, make up your own. All i did was just do stokes downwards.


Step 10: Now to draw on clothes!! Just do any type of clothing you want, i just did  a simple dress. you could draw a t-shirt, fancy dress, anything that you would like! You could also add wrinkles to the clothes, but i didn't.


Step 11: now you can just shade it or colour it with coloured pencils, and fix up any lines.
Sorry, I'm not a great drawer, but i hope you enjoyed!!!! :)


Sunday 19 February 2012

Photoshop animation


This is what i did today on Photoshop. :)
I hope you like this animation.
Enjoyy!!! ;D
P.S. im sorry i can't do a tutorial on this :( its just that its abit hard to explain, and i have the old photoshop at home, and it can't do animation:( plus my friend helped me with it :)

anyway, do you like it? comment it you like it or not :) and what i could improve on ;)

The Movies.... :)

Hey guys :) this weekly post is about the movie i saw with my friends .

In the weekend i went to the movies with a couple of friends, and we saw 'This Means War.' It was a great movie, and i suggest that you all go and see it!! Its about two spy's that are friends, and meet this girl, that they both like. then one day they are talking about this girl that they had met, and find out that its the same girl. So they both go spy on her, put cameras in her house, etc. So basically they are fight over a girl. <3 'Who gets the girl' you ask... watch the movie to find out.... ;D

During the movie, there were these guys in front of us and one of them does a really loud, unusual sneezing sound!! it was soooooooooo funny!!! Me and my friends couldn't stop laughing :D Anyway.... that's besides the point...

 The movie was great!!!! I rate it a 4.5 out of 5 stars!! :D

If you have any good movie selections comment below :)


(Credit for this picture goes to: Film Filia)
Here's a link to their website:
http://www.filmofilia.com/this-means-war-uk-poster-87705/

Also here's a link to the trailer:
http://www.youtube.com/watch?v=oleuD8479uM


Credit for this picture goes to: http://www.hollywood3.ca/about-hollywood-3/on-screen-advertising/


And we bought popcoen. mmmm that was nice, i also bought m n m's ;)


For the popcorn, credit goes to: http://www.selfhelpdaily.com/theater-popcorn-calories/ 

Tuesday 14 February 2012

Polymer clay things i made

Hey guys :)
since its Valentines Day today, i decided to make a polymer clay 'LOVE' cake.
hope you like :) and Happy Valentines day <3 :D How i did this was i got one piece of white, two pieces of pick, squished them together, and made it into a heart shape. Then i got a big piece if white clay, rolled it out, very thin, and wrapped it around the heart, cut out a slice of it, got some pink clay a made the letters, and stuck them on.

 Heres a polymer clay cupcake :) i hope you like it. If you want to know how to make this, go to my How to section and you'll find it there :) ( and sorry, this picture is sideways :/ )


Heres a polymer clay ice block :) i hope you like this to :) All i did to make this ice block was i took the excess of my cupcake icing and squished it down, cut the end of a tooth pick and stuck it in :) simple as that:)
Well i hope you like these creations :) byeeee  (and sorry this picture is sideways :/ )

Monday 13 February 2012

How to make a polymer clay cupcake

This is a video on how to make a polymer clay cupcake :)
ENJOY!!


Here's a step by step, typed in case you can't watch the video or something...

Materials:
-Polymer Clay
-a tooth pick/pin
-baby wipes, to clean your hands and the area your working on (because water makes the clay go weird so thats why you use baby wipes.)

Step 1: Choose a colour for your base of your cupcake  first roll it into a ball.
Step 2: Then roll it into a short snake, and push down, to get a cylinder sorta shape. repeat this step if you don't    like the look of it.
Step 3: Next for the icing.. roll out a snake of a different colour. ( if you want 2 or more colours for the icing, roll out 2 or more snakes and stick them together.Then twist.)
Step 4: Get you tooth pick/pin and make vertical lines in the base of your cupcake.
Step 5: Now get your icing, and swirl it onto your cupcake.
Step 6: Now bake it in the oven, with the time and heat setting that says on your packaging on the polymer clay.

Enjoyy :D