Labels

Sunday 25 March 2012

Easter Holidays! :)

Hey guys, its me... once again! :D

Guess what!?!?! Easter holidays is coming up!! :) yay!! In one week i can finally get away from school, and relax!! Man, the year is going so fast, lets hope we survive till 2013!! :) But anyway....
This blog post is going to be about what im going and want to do these holidays. So its a 2 week holiday, and I'm probably going to do most of things in this list :).
Well its my friends birthday-Chloe's Pencil Pals, Which is very exciting!!  i'll probably see her during the holidays. yay :)

So here we gooo....

1. Chill with some friends. :D
2. See some family. :D
3. Relax! :D
4. Start reading that book. - Tomorrow When The War Began :D
5. Get chocolate, since its easter.. yummm :D
6. See the Hunger Games movie, looks soo good!! – If you have seen this movie comment what you rate it out of 5 stars. :D
7. Celebrate Chloe's Pencil Pals birthday! :D
8. and... Enjoy having no homework. :D


What are you going to do in the holidays? leave a comment below, saying what you want to do in the holidays :)
Anyway, hope you enjoyed this weekly post.


Comment Below!!!! i hope you like this pic i did in photoshop ;)


Chocolate bunny, yummm, i hope you like what i did on photoshop... again ;)


This is the movie i want to see.
Credit fo this picture goes to: http://www.scificool.com/hunger-games-movie-shows-movement-at-last/
My polymer clay creation collection (so far)

Hey guys, me again, with another weekly post.
This weekly post is pictures of all my polymer clay creations collection (so far)

Hope you enjoy!!! :)

 Here are some polymer clay cupcakes.  i have a tutorial on How To make these in my how to tab.

Here are some multicoloured ice creams/Popsicle sticks.

 Here's a LOVE cake, that i made because it was Valintines day.

 Here's a cheese burger. Sorry you cant see the meat..

 Here's a purple and pink macaroon. i really want to tase one of these!!

 Here are two mustaches. By the way, it was made out of white clay and painted with black nail polish, because i have no black clay.

 Here's a swirl lollipop and a random swirl.

 Heres a flat bow.

 Here's a rainbow that made out of three colours.

 Here's a soft drink and a bun.

And finally, here's a Mamagoma, and this character is from San-x i think.


Thank you all very much and have a great day!! hope you enjoyed this, and sorry there's not a lot.

byeeee..

Tuesday 20 March 2012

how to make an origami bow

Hey guys, this How to is how to make an origami bow :) i hope you like, enjoy and can understand the instructions.

Materials you will need:
-Paper
-Siccors

Step1: get an  A4 piece of paper (if you already have a square piece of paper, skip this step.) and fold it into the biggest triangle you can do. Now cut off the excess at the top. unfold.

Step 2: once unfolded, fold in half, vertically, unfold and cut across the crease.

Step 3: fold in half again. then unfold.

Step 4: fold both sides into the middle.
Step 5: Fold down, horazontially. Then unfold.

Step 6: Now fold the two sides up to the middle crease.

Step 7: Unfold. you should get something like this.

Step 8: get the first crease, and fold upwards. Do the same on the other side.

Step 9: Now you should have something like this.

Step 10: Now flip it over and fold both sides up to the middle.

Step 11: Open up the sides a little and fold the squares into triangles. Repeat on the other side.

 Step 12: Now you should have something like this. flip it round, to the front.

Step 13: You should now have something like this.

I hope you enjoyed. Heres a video to watch if you dont understand my instructions.
By the way, i got this bow from this tutorial :)

Anyway.... i hope you enjoyed... byeeeee

Monday 19 March 2012

Trip

Hey guys, as you may already know, i went on holiday last week :D it was great!!
Well this weekly post is about what a bought.
Where i went, things were really cheap!! So here are some things that i bought....


Heres a new pair of shoes i got, I was going to get more, but my feet are a size too big for the shoes over there :(  When i saw these shoes, i really looved them, and im soo happy i got them :)

Heres this really cute, new bag i bought, dont you think it looks cute? I really love this bag! But it did take me while to find a bag, because i didnt really like some of the bags they had over there, but i liked one, but it was expensive. then i found this bag, and just looved it!


And heres a few clothes i bought. Pink skinny jeans, t-shirt, and a skirt. I did buy more clothes, but there was too much, so i just put a few things up. I really love everything i bought! I love these pink skinny jeans! soo cute, and i love the t-shirt, i dont know if you can see in the picture, but there are some sparkly dots of the shirt, which i love. and the skirt, i really love it! its a fitting skirt, love the colours of it.

Basicly i love everything i bought, and nearly everything was cheap as chips!!!!

Well i hope you enjoyed, and like some of the things i bought.

How to draw a cute bunny

 Hey guys, sorry its been awhile, i was on holiday, i have about it in my weekly post :)

Anyway, this how to is How to draw a cute bunny :)  i got this idea from a tutorial on YouTube.

The materials you'll need:
-Pencil
-rubber
-piece of paper (can be any size you want)
-coloured pencils

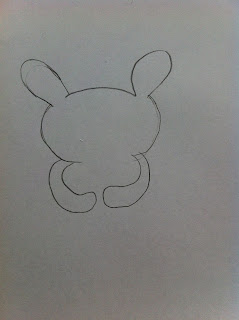
Step 1: Draw a curved line, this is going to be the top of the head.

 Step 2: Draw two long curved shapes, like shown. These are going to be the ears.

 Step 3: draw two curved lines to form the sides of the head. (Don't worry, if you muck up something, you can always rub it out or fix it up later)

Step 4: Draw two curvy lines, sort of like a snakes head shape. These are going to be the arms.

 Step 5: draw a carrot between its hands, like shown above.

 Steep 6: Now draw a half circle shape at the bottom. This is going to be where the feet are going to go.

 Step 7: Draw two oval shapes, on the sides of the line we just drew. These are the feet.

 Step 8: Draw one curved line with a point at the end in the ears. this is the detailing in the ears.

 Step 9: Draw two circles and fill them in with your pencil. These are the eyes.

 Step 10: Draw a little upside down triangle, this is the nose.

 Step 11: Draw two curved lines, under the nose. This is the mouth.

 Step 12: Now fine line it, you can fix up any mistakes you did.

Step 13: Now just colour it in and your done.
Tip: If you want to make your bunny look more realistic, shade the sides of the bunny with a darker colour.

Sunday 4 March 2012

About meeee :)

Hey guys :)

My name is Chantelle, and this blog i'm going to share one of the things i love doing, which is crafty and arty things. My favourite things to draw are manga people and cats. Well... i like to draw lots of different things, but they are my favourite things to draw.

My favourite animal is cats. :3 And i hate sports. hahaha. When i was younger, i liked to play with play-doh and make things out of them. It was very fun :D But now since i'm older, i make things with Polymer clay, which is a oven bake clay, sorta similer to play-doh.

Here are some YoutTube people i like:
Mark Crilley:
http://www.youtube.com/markcrilley

Socraftastic:
http://www.youtube.com/socraftastic

byee :)

All about Casey :)

Hey guys :)

This weekly post is going to be about one of my friends, Casey. She also has a blog :)
Her blog is called Fit 4 Fun (Now called Crafts 4 Fun) . Her blog has some great How to's on healthy eating  and some great craft ideas :D

She loves sports, unlike me, i hate sports. She loves running and eating fruit and vegetables :)
She also loves art, like me :D She loves to draw horses and dogs. She has a very active Labrador, named Cody :3 She takes him for walks at night.

When she was younger, she liked to draw houses. I like her blog, even though i don't really like fruit. haha.
Heres a link to her blog:


Here are some of her how tos's:


Greek Peasant Salad                                                                           How to keep your room organised
                                                           
                                                        How to make scoobies....
And more~!

http://caseysblogfit4fun.blogspot.com.au/search/label/Home

Please go and visit her blog :)
Hope you enjoy :D byeeee

Next week

hey guys :)
Next week i won't be here because i'm going on holiday :D So i might have some pictures up of my holiday :) I don't know yet about the photo's though....When i get back, i'll do a How to and weekly post :) Anyway, i hope you enjoy this weeks, How to and weekly post. byeee :)

Wacky drawing

Hey guys :) Me again, this is just a picture i drew, how to do this is you just do squiggly lines, and join them together, into a blob like shape. then just colour it it. i did rainbow strips. I got his idea from someone from YouTube, but i dont know their username, im sorry :(
Do you guys like these sort of wacky drawings? and sorry, i had bad lighting, but the colours are brighter than this :)
Well enjoyy!!!! :D
                                                   

                                                         Heres one i did on photoshop ;)


Heres another type of wacky drawing picture i did :) hope you like :)

How to make a Domo bookmark

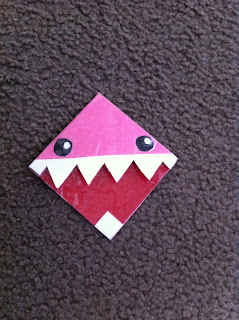
Hey Guys :) Today im going to show you all how to make a Domo bookmark :) So this is what it looks like.  You dont have to make a pink Domo, you can pick any colour you want :) im going to be making a blue one for the tutorial :) Enjoyy!!! :D

The Materials:
-Coloured paper: red, for the mouth, black, for the eyes, white, for the teeth and the colour you want your Domo to be, in my case, that is blue.
-Siccors
-Glue
-Ruler


Step 1: Get your Domo coloured piece of paper and draw 3 squares like shown in the picture. (5.5cm by 5.5cm) Then on the top and bottom right square draw a diaginal line. Now cut it out. it should look like....


 Step 2: This!! Now rub out any pencil lines you can see.


 Step 3: Now fold up 1 corner, and it should look like this. now repeat this step for the other corner.

 Step 4: Now it should look something like this. now turn it round so the 2 flaps are at the top.

Step 5: Now lift up the first flap and glue it down. It doesn't matter if it doesn't look even, cause we are going to cover it up soon.


 Step 6: Now get your red piece of paper, and outline your square, like this.


 Step 7: Cut out your red piece of paper, and slip it through the blue piece, to see if it fits. If its to big, just trim it. Now that it fits, glue it down.

 Step 8: Get your white piece of paper, and cut out a strip, this is going to be the teeth. Start to cut triangles out to get this shape.


 Step 9: Glue on the teeth, overlaping the blue (or what ever colour you have) just a tiny bit.


Step 10: get your black piece of paper, and draw a circle, this is going to be the eyes. cut out 2 circles.


 Step 11: Glue on your eyes. for the white of the eye, just cut 2 tiny circles and glue them on. For the bottom tooth, just cut out a white square, and glue it on the bottom.


To use this bookmark, just slip the corner of the page into the mouth, and it will look like this.
I hope you enjoyed :) thank you!!